Suggested Videos
Part 7 - jQuery attribute selector
Part 8 - jQuery attribute value selector
Part 9 - jQuery case insensitive attribute selector
In this video we will discuss the difference between $(input) and $(:input) selectors
$(':input') selects all input, textarea, select and button elements where as $('input') just selects elements with an input tag.
Consider the web page below

The following is the HTML of the above page
Part 7 - jQuery attribute selector
Part 8 - jQuery attribute value selector
Part 9 - jQuery case insensitive attribute selector
In this video we will discuss the difference between $(input) and $(:input) selectors
$(':input') selects all input, textarea, select and button elements where as $('input') just selects elements with an input tag.
Consider the web page below
The following is the HTML of the above page
<html>
If you are searching life partner. your searching end with kpmarriage.com. now kpmarriage.com offer free matrimonial website which offer free message, free chat, free view contact information. so register here : kpmarriage.com- Free matrimonial website
jQuery attribute value selectors
on 1:39 AM

Suggested Videos
Part 5 - jQuery Element Selector
Part 6 - jQuery class selector
Part 7 - jQuery attribute selector
In this video we will discuss
Attribute Equals Selector [name="value"]
Attribute Not Equal Selector [name!="value"]
Attribute Contains Selector [name*="value"]
Attribute Contains Word Selector [name~="value"]
Attribute Contains Prefix Selector [name|="value"]
Attribute Starts With Selector [name^="value"]
Attribute Ends With Selector [name$="value"]
This is continuation to Part 7, please watch Part 7 before proceeding.
Selects all elements that have title attribute value equal to div1Title
$('[title="div1Title"]')
Selects all elements that have title attribute value not equal to div1Title
$('[title!="div1Title"]')
Selects all elements that have title attribute value containing the given substring - Title
$('[title*="Title"]')
Selects all elements that have title attribute value containing the given word - mySpan, delimited by spaces
$('[title~="mySpan"]')
Selects all elements that have title attribute value equal to myTitle or starting with myTitle followed by a hyphen (-)
$('[title|="myTitle"]')
Selects all elements that have title attribute value starting with div
$('[title^="div"]')
Selects all elements that have title attribute value ending with Heading
$('[title$="Heading"]')
Selects all elements that have title attribute value equal to div1Title and sets 5px solid red border
If you are searching life partner. your searching end with kpmarriage.com. now kpmarriage.com offer free matrimonial website which offer free message, free chat, free view contact information. so register here : kpmarriage.com- Free matrimonial website
Part 5 - jQuery Element Selector
Part 6 - jQuery class selector
Part 7 - jQuery attribute selector
In this video we will discuss
Attribute Equals Selector [name="value"]
Attribute Not Equal Selector [name!="value"]
Attribute Contains Selector [name*="value"]
Attribute Contains Word Selector [name~="value"]
Attribute Contains Prefix Selector [name|="value"]
Attribute Starts With Selector [name^="value"]
Attribute Ends With Selector [name$="value"]
This is continuation to Part 7, please watch Part 7 before proceeding.
Selects all elements that have title attribute value equal to div1Title
$('[title="div1Title"]')
Selects all elements that have title attribute value not equal to div1Title
$('[title!="div1Title"]')
Selects all elements that have title attribute value containing the given substring - Title
$('[title*="Title"]')
Selects all elements that have title attribute value containing the given word - mySpan, delimited by spaces
$('[title~="mySpan"]')
Selects all elements that have title attribute value equal to myTitle or starting with myTitle followed by a hyphen (-)
$('[title|="myTitle"]')
Selects all elements that have title attribute value starting with div
$('[title^="div"]')
Selects all elements that have title attribute value ending with Heading
$('[title$="Heading"]')
Selects all elements that have title attribute value equal to div1Title and sets 5px solid red border
<html>
If you are searching life partner. your searching end with kpmarriage.com. now kpmarriage.com offer free matrimonial website which offer free message, free chat, free view contact information. so register here : kpmarriage.com- Free matrimonial website
jQuery attribute selector
on 1:39 AM
Suggested Videos
Part 4 - jQuery #id selector
Part 5 - jQuery Element Selector
Part 6 - jQuery class selector
In this video we will discuss selecting elements
1. That have specified attribute
2. That have specified attribute values
Syntax :
$('[attribute]')
$('[attribute="value"]')
Part 4 - jQuery #id selector
Part 5 - jQuery Element Selector
Part 6 - jQuery class selector
In this video we will discuss selecting elements
1. That have specified attribute
2. That have specified attribute values
Syntax :
$('[attribute]')
$('[attribute="value"]')
$('[title]') // Selects all elements that have title attribute
If you are searching life partner. your searching end with kpmarriage.com. now kpmarriage.com offer free matrimonial website which offer free message, free chat, free view contact information. so register here : kpmarriage.com- Free matrimonial website
jQuery class selector
on 1:38 AM
Suggested Videos
Part 3 - Benefits of using CDN
Part 4 - jQuery #id selector
Part 5 - jQuery Element Selector
In this video we will discuss jQuery class selector i.e selecting elements using their class name
Syntax : $('.class')
jQuery class selectors uses JavaScript's native getElementsByClassName() function if the browser supports it.
$('.small') // Selects all elements with class small
If you are searching life partner. your searching end with kpmarriage.com. now kpmarriage.com offer free matrimonial website which offer free message, free chat, free view contact information. so register here : kpmarriage.com- Free matrimonial website
jQuery Element Selector
on 1:38 AM
Suggested Videos
Part 2 - What is $(document).ready(function() in jquery
Part 3 - Benefits of using CDN
Part 4 - jQuery #id selector
In this video we will discuss jQuery Element Selector, i.e selecting elements by tag name.
To select the elements by tag name use jQuery Element Selector
Syntax : $(element)
Part 2 - What is $(document).ready(function() in jquery
Part 3 - Benefits of using CDN
Part 4 - jQuery #id selector
In this video we will discuss jQuery Element Selector, i.e selecting elements by tag name.
To select the elements by tag name use jQuery Element Selector
Syntax : $(element)
$('td') // Selects all td elements
If you are searching life partner. your searching end with kpmarriage.com. now kpmarriage.com offer free matrimonial website which offer free message, free chat, free view contact information. so register here : kpmarriage.com- Free matrimonial website
jQuery #id selector
on 1:38 AM
Suggested Videos
Part 1 - What is jQuery
Part 2 - What is $(document).ready(function() in jquery
Part 3 - Benefits of using CDN
In this video we will discuss
1. What are jQuery selectors
2. Different selectors in jQuery
3. #id selector in jquery
What are jQuery selectors
One of the most important concept in jQuery is selectors. jQuery selectors allow you to select and manipulate HTML elements.
Different selectors in jQuery
jQuery selectors allow you to select html elements in the DOM by
1. Element ID
2. Element Tag Name
3. Element Class Name
4. Element attribute
5. Element Attribute values and many more
Id selector in jquery
To find an HTML element by ID, use the jQuery #id selector
Example : The following example finds button with ID button1 and attaches the click event handler.
<html>
If you are searching life partner. your searching end with kpmarriage.com. now kpmarriage.com offer free matrimonial website which offer free message, free chat, free view contact information. so register here : kpmarriage.com- Free matrimonial website
Benefits of using CDN
on 1:38 AM
Suggested Videos
Part 1 - What is jQuery
Part 2 - What is $(document).ready(function() in jquery
In this video we will discuss
1. What is a CDN
2. Advantages and disadvantages of loading jQuery from CDN
3. What if the required jQuery file cannot be downloaded from CDN
What is a CDN
CDN stands for Content Delivery Network. A CDN is a system of distributed servers that hosts resources such as images, CSS, JavaScript files etc.
Companies like Microsoft, Google, Yahoo etc have a free public CDN from which we can load jQuery instead of hosting it on our own web server.
Microsoft jQuery CDN
http://www.asp.net/ajax/cdn#jQuery_Releases_on_the_CDN_0
Google jQuery CDN
https://developers.google.com/speed/libraries/devguide#jquery
Advantages of using a CDN
1. Distributed CDN servers : The jQuery file can be downloaded from the CDN server that is closest to the user
2. Browser Caching : jQuery is used on many popular websites. If a user has already visited a webpage that uses jQuery from a CDN, and then if he arrives at your page, the jQuery file has already been cached by the browser so there is no need to download it again.
3. Parallel Downloads : There is a browser limit on how many files can be concurrently downloaded from a given domain. This number varies from browser to browser. For example, if the browser allows only 2 concurrent downloads from a given domain, the 3rd download is blocked until one of the previous files has been fully downloaded. Since the jQuery file is on a CDN, it is being downloaded from a different domain. So this means the browser allows another 2 parallel downloads from the CDN server.
4. Reduced server load : The HTTP request for jQuery file is handled by the CDN server, so the load on your web server is reduced. This also means there is a saving on your website bandwidth consumption which in turn will reduce your hosting cost.
Disadvantages of using a CDN
Your clients may block the CDN. So you may have to request your clients to whitelist the CDN.
What if the required jQuery file cannot be downloaded from CDN
Let assume that, the CDN is down or because of some network issue we are not able to download jQuery from CDN. In this case we will have to fallback to use jQuery file that we hosted on our own server.
Here is the code that falls back to use jQuery on your web server, if it can't be downloaded from CDN. If jQuery is successfully downloaded, jQuery property is added to the window object. If this property is not found then jQuery is not downloaded. So in this case we are writing a script tag to fallback to the local jQuery file.
<script src="http://ajax.aspnetcdn.com/ajax/jQuery/jquery-2.1.3.min.js"></script>
If you are searching life partner. your searching end with kpmarriage.com. now kpmarriage.com offer free matrimonial website which offer free message, free chat, free view contact information. so register here : kpmarriage.com- Free matrimonial website
What is $(document).ready(function() in jquery
on 1:38 AM
Suggested Videos
Part 1 - What is jQuery
In this video we will discuss
1. What is $(document).ready(function() in jQuery and when to use it
2. Difference between $(window).load and $(document).ready
$(document).ready is a jQuery event. It fires as soon as the DOM is loaded and ready to be manipulated by script. This is the earliest point in the page load process where the script can safely access elements in the page's html DOM. This event is fired before all the images, css etc.. are fully loaded.
The following example works, because the jquery code that adds the event handler to the button is inside the ready() function, which ensures that the DOM is fully loaded before this piece of code is executed, so the JavaScript can find the button element in the DOM and adds the click event handler.
<html>
If you are searching life partner. your searching end with kpmarriage.com. now kpmarriage.com offer free matrimonial website which offer free message, free chat, free view contact information. so register here : kpmarriage.com- Free matrimonial website
What is jQuery
on 1:37 AM
Suggested Video Tutorials
JavaScript Tutorial
Using JavaScript with ASP.NET
ASP.NET Tutorial
What is jQuery
jQuery is a lightweight JavaScript library that simplifies programming with JavaScript.
According to jQuery.com
jQuery is a fast, small, and feature-rich JavaScript library. It makes things like HTML document traversal and manipulation, event handling, animation, and Ajax much simpler with an easy-to-use API that works across a multitude of browsers. With a combination of versatility and extensibility, jQuery has changed the way that millions of people write JavaScript.
Why should we use jQuery
OR
Advantages of using jQuery over raw JavaScript
The use of JQuery has several benefits over using the raw javascript.
1. jQuery is cross-browser
2. jQuery is a lot more easy to use than raw javascript
3. jQuery is extensible
4. jQuery simplifies and has rich AJAX support
5. jQuery has large development community and many plugins. Example autocomplete textbox plugin.
6. Excellent documentation
How to use jQuery in a web application
Download the jQuery file from jQuery.com and reference it in your application just like any other JavaScript file.
What is the difference between jQuery 1.x and 2.x
If you want to support IE6/7/8, then use jQuery 1.x where as if you don't have the need to support IE6/7/8 then use jQuery 2.x. jQuery 2.x is smaller in size than jQuery 1.x.
Example : Adding a click event handler for a button control using raw JavaScript. addEventListener() method is not supported in IE < 9.
If you are searching life partner. your searching end with kpmarriage.com. now kpmarriage.com offer free matrimonial website which offer free message, free chat, free view contact information. so register here : kpmarriage.com- Free matrimonial website
JavaScript Tutorial
Using JavaScript with ASP.NET
ASP.NET Tutorial
What is jQuery
jQuery is a lightweight JavaScript library that simplifies programming with JavaScript.
According to jQuery.com
jQuery is a fast, small, and feature-rich JavaScript library. It makes things like HTML document traversal and manipulation, event handling, animation, and Ajax much simpler with an easy-to-use API that works across a multitude of browsers. With a combination of versatility and extensibility, jQuery has changed the way that millions of people write JavaScript.
Why should we use jQuery
OR
Advantages of using jQuery over raw JavaScript
The use of JQuery has several benefits over using the raw javascript.
1. jQuery is cross-browser
2. jQuery is a lot more easy to use than raw javascript
3. jQuery is extensible
4. jQuery simplifies and has rich AJAX support
5. jQuery has large development community and many plugins. Example autocomplete textbox plugin.
6. Excellent documentation
How to use jQuery in a web application
Download the jQuery file from jQuery.com and reference it in your application just like any other JavaScript file.
What is the difference between jQuery 1.x and 2.x
If you want to support IE6/7/8, then use jQuery 1.x where as if you don't have the need to support IE6/7/8 then use jQuery 2.x. jQuery 2.x is smaller in size than jQuery 1.x.
Example : Adding a click event handler for a button control using raw JavaScript. addEventListener() method is not supported in IE < 9.
<script type="text/javascript">
If you are searching life partner. your searching end with kpmarriage.com. now kpmarriage.com offer free matrimonial website which offer free message, free chat, free view contact information. so register here : kpmarriage.com- Free matrimonial website
Saturday, September 26, 2015
How to show images from database in gridview in asp.net
on 2:39 AM
Suggested Videos
Part 168 - Customizing recaptcha control
Part 169 - Save image to database using asp.net
Part 170 - Load image from database in asp.net
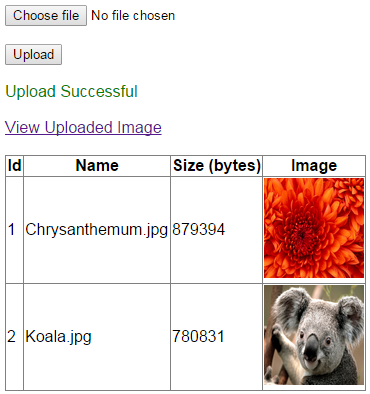
In this video we will discuss how to retrieve images from database and display them in gridview using c# and asp.net. This is continuation to Parts 169 and 170. Please watch Parts 169 and 170 from ASP.NET tutorial for beginners tutorial.
When the web page initially loads, all the images should be retrieved from the database table and displayed in the GridView control. When you click upload button, the new image should be uploaded to the database, and the GridView should refresh and display the image you just uploaded.
Webform HTML
Part 168 - Customizing recaptcha control
Part 169 - Save image to database using asp.net
Part 170 - Load image from database in asp.net
In this video we will discuss how to retrieve images from database and display them in gridview using c# and asp.net. This is continuation to Parts 169 and 170. Please watch Parts 169 and 170 from ASP.NET tutorial for beginners tutorial.
When the web page initially loads, all the images should be retrieved from the database table and displayed in the GridView control. When you click upload button, the new image should be uploaded to the database, and the GridView should refresh and display the image you just uploaded.
Webform HTML
<asp:FileUpload ID="FileUpload1" runat="server" />
If you are searching life partner. your searching end with kpmarriage.com. now kpmarriage.com offer free matrimonial website which offer free message, free chat, free view contact information. so register here : kpmarriage.com- Free matrimonial website
Load image from database in asp.net
on 2:39 AM
Suggested Videos
Part 167 - Using ASP.NET validation controls with recaptcha
Part 168 - Customizing recaptcha control
Part 169 - Save image to database using asp.net
In this video we will discuss how to load image from database using asp.net and c#. This is continuation to Part 169. Please watch Part 169 from ASP.NET tutorial for beginner.
When we click on "View Uploaded Image" link, the user will be redirected to WebForm2.aspx. The Id of the image will be passed as a query string parameter. In the page load event, we need to retrieve the image from the database and display it on the web page.
Step 1 : Create stored procedure to retrieve image by Id.
Create procedure spGetImageById
If you are searching life partner. your searching end with kpmarriage.com. now kpmarriage.com offer free matrimonial website which offer free message, free chat, free view contact information. so register here : kpmarriage.com- Free matrimonial website
Save image to database using asp.net
on 2:39 AM
Suggested Videos
Part 166 - Captcha control in asp.net
Part 167 - Using ASP.NET validation controls with recaptcha
Part 168 - Customizing recaptcha control
In this video we will discuss how to save images to database table using asp.net and c#.

When upload button is clicked, the image should be uploaded to a database table and "View Uploaded Image" link should appear. When you click on this link we should load the image from the database and display it on the web page.

In this video we will discuss how to upload the image to the database. In our next video we will discuss how to download the image from the database and display it on the web page.
Step 1 : Create table tblImages. This table stores the uploaded images along with it's name and size in bytes.
Part 166 - Captcha control in asp.net
Part 167 - Using ASP.NET validation controls with recaptcha
Part 168 - Customizing recaptcha control
In this video we will discuss how to save images to database table using asp.net and c#.
When upload button is clicked, the image should be uploaded to a database table and "View Uploaded Image" link should appear. When you click on this link we should load the image from the database and display it on the web page.
In this video we will discuss how to upload the image to the database. In our next video we will discuss how to download the image from the database and display it on the web page.
Step 1 : Create table tblImages. This table stores the uploaded images along with it's name and size in bytes.
Create table tblImages
If you are searching life partner. your searching end with kpmarriage.com. now kpmarriage.com offer free matrimonial website which offer free message, free chat, free view contact information. so register here : kpmarriage.com- Free matrimonial website
Customizing recaptcha control
on 2:39 AM
Suggested Videos
Part 165 - How to display an icon for website on browser tab
Part 166 - Captcha control in asp.net
Part 167 - Using ASP.NET validation controls with recaptcha
In this short video we will discuss using the standard themes that come with recaptcha control to customize it's look and feel in an asp.net web application.
The following are the different standard themes available. The default theme is red.
1. red
2. white
3. blackglass
4. clean
The Theme property can be set declaratively in the HTML or programatically in the code-behind file. The theme that is set programatically overrides the theme that is set declaratively in the HTML.
The following example sets the Theme property to blackglass
<recaptcha:RecaptchaControl ID="recaptcha" Theme="blackglass"
If you are searching life partner. your searching end with kpmarriage.com. now kpmarriage.com offer free matrimonial website which offer free message, free chat, free view contact information. so register here : kpmarriage.com- Free matrimonial website
Using ASP.NET validation controls with recaptcha
on 2:39 AM
Suggested Videos
Part 164 - Displaying organization employee chart using treeview control
Part 165 - How to display an icon for website on browser tab
Part 166 - Captcha control in asp.net
In this video, we will discuss using ASP.NET validation controls with recaptcha control. This is continuation to Part 166. Please watch Part 166, before proceeding.
If you have a validation summary control on the page and if the Recaptcha control has failed validation it automatically displays the error message in Validation Summary control. All you need is a validation summary control on the page where you want the error message to appear.
Include validation summary control on the page
<asp:ValidationSummary ID="ValidationSummary1" ForeColor="Red" runat="server" />
Run the application and click the Submit Button. Notice that the error message is displayed in the validation summary control as expected.

Now let's discuss using a custom validator control with the recaptcha control. When the word verification fails we want to display a RED asterisk (*) next to the captcha control and the error message in validation summary control.

To achieve this
Step 1 : Include the custom validator on the page where you want the RED asterisk (*) to appear
Part 164 - Displaying organization employee chart using treeview control
Part 165 - How to display an icon for website on browser tab
Part 166 - Captcha control in asp.net
In this video, we will discuss using ASP.NET validation controls with recaptcha control. This is continuation to Part 166. Please watch Part 166, before proceeding.
If you have a validation summary control on the page and if the Recaptcha control has failed validation it automatically displays the error message in Validation Summary control. All you need is a validation summary control on the page where you want the error message to appear.
Include validation summary control on the page
<asp:ValidationSummary ID="ValidationSummary1" ForeColor="Red" runat="server" />
Run the application and click the Submit Button. Notice that the error message is displayed in the validation summary control as expected.
Now let's discuss using a custom validator control with the recaptcha control. When the word verification fails we want to display a RED asterisk (*) next to the captcha control and the error message in validation summary control.
To achieve this
Step 1 : Include the custom validator on the page where you want the RED asterisk (*) to appear
<asp:CustomValidator ID="CustomValidator1" runat="server" Text="*" ForeColor="Red"
If you are searching life partner. your searching end with kpmarriage.com. now kpmarriage.com offer free matrimonial website which offer free message, free chat, free view contact information. so register here : kpmarriage.com- Free matrimonial website
Captcha control in asp.net
on 2:39 AM
Suggested Videos
Part 163 - Dynamically adding treenodes to treeview control
Part 164 - Displaying organization employee chart using treeview control
Part 165 - How to display an icon for website on browser tab
In this video, we will discuss using captcha control in asp.net web application.
What is the use of Captcha control
The term CAPTCHA stands for Completely Automated Public Turing Test To Tell Computers and Humans Apart. The following are the 2 most compelling reason for using captcha control
1. To prevent automated computer programs from submitting comments (SPAM). CAPTCHA control ensures only humans can enter comments.
2. To prevent bogus user registrations. For example, when you try to create a new gmail account, notice that there is a captcha control displayed on the registration page. This ensures only humans can register and not automated scripts.
It is very difficult for automated computer programs to read the distorted text displayed in a captcha control.
Example : The data entered in the webform below should only be saved to the database table when captcha control passes validation

There are several free captcha controls available on the internet. I have tested reCAPTCHA control with ASP.NET and works very well. It is very easy to integrate as well. Here are the steps.
Step 1 : Sign up for API keys.
https://developers.google.com/recaptcha/intro
Step 2 : Download reCAPTCHA ASP.NET library
https://developers.google.com/recaptcha/docs/aspnet
Step 3 : Extract Recaptcha.dll from the downloaded ZIP folder
Step 4 : Create an empty asp.net web application. Name it Demo. Add a reference to Recaptcha.dll assembly.
Step 5 : Include the database connection string in web.config file
Step 6 : Create database table RegisteredUsers to store data
Part 163 - Dynamically adding treenodes to treeview control
Part 164 - Displaying organization employee chart using treeview control
Part 165 - How to display an icon for website on browser tab
In this video, we will discuss using captcha control in asp.net web application.
What is the use of Captcha control
The term CAPTCHA stands for Completely Automated Public Turing Test To Tell Computers and Humans Apart. The following are the 2 most compelling reason for using captcha control
1. To prevent automated computer programs from submitting comments (SPAM). CAPTCHA control ensures only humans can enter comments.
2. To prevent bogus user registrations. For example, when you try to create a new gmail account, notice that there is a captcha control displayed on the registration page. This ensures only humans can register and not automated scripts.
It is very difficult for automated computer programs to read the distorted text displayed in a captcha control.
Example : The data entered in the webform below should only be saved to the database table when captcha control passes validation
There are several free captcha controls available on the internet. I have tested reCAPTCHA control with ASP.NET and works very well. It is very easy to integrate as well. Here are the steps.
Step 1 : Sign up for API keys.
https://developers.google.com/recaptcha/intro
Step 2 : Download reCAPTCHA ASP.NET library
https://developers.google.com/recaptcha/docs/aspnet
Step 3 : Extract Recaptcha.dll from the downloaded ZIP folder
Step 4 : Create an empty asp.net web application. Name it Demo. Add a reference to Recaptcha.dll assembly.
Step 5 : Include the database connection string in web.config file
Step 6 : Create database table RegisteredUsers to store data
Create table RegisteredUsers
If you are searching life partner. your searching end with kpmarriage.com. now kpmarriage.com offer free matrimonial website which offer free message, free chat, free view contact information. so register here : kpmarriage.com- Free matrimonial website
How to display an icon for website on browser tab
on 2:39 AM
Suggested Videos
Part 162 - Binding asp.net treeview control to database table
Part 163 - Dynamically adding treenodes to treeview control
Part 164 - Displaying organization employee chart using treeview control
In this video we will discuss displaying an icon for an asp.net website on a browser tab. Let me explain what I mean.
Navigate to http://www.Google.com, notice in the address bar an icon is displayed.

This icon is called favicon (short for Favorite icon). It is also known as a shortcut icon, Web site icon, tab icon or bookmark icon.
The size of the image should be 16 X16 pixels and it should be named favicon.ico. You can either create your own image or use many free websites that are available. http://www.favicon.cc is one such website.
Once you have the image, place it in the root directory of your web application and include the following link in the head section of the page. If you have a master page, place it in the head section of the master page.
<link rel="shortcut icon" href="~/favicon.ico" type="image/x-icon"/>
If you are testing this on your local machine, make sure to use local IIS Web Server instead of built-in visual studio development server, otherwise the image will not be displayed.

Part 162 - Binding asp.net treeview control to database table
Part 163 - Dynamically adding treenodes to treeview control
Part 164 - Displaying organization employee chart using treeview control
In this video we will discuss displaying an icon for an asp.net website on a browser tab. Let me explain what I mean.
Navigate to http://www.Google.com, notice in the address bar an icon is displayed.
This icon is called favicon (short for Favorite icon). It is also known as a shortcut icon, Web site icon, tab icon or bookmark icon.
The size of the image should be 16 X16 pixels and it should be named favicon.ico. You can either create your own image or use many free websites that are available. http://www.favicon.cc is one such website.
Once you have the image, place it in the root directory of your web application and include the following link in the head section of the page. If you have a master page, place it in the head section of the master page.
<link rel="shortcut icon" href="~/favicon.ico" type="image/x-icon"/>
If you are testing this on your local machine, make sure to use local IIS Web Server instead of built-in visual studio development server, otherwise the image will not be displayed.
If you are searching life partner. your searching end with kpmarriage.com. now kpmarriage.com offer free matrimonial website which offer free message, free chat, free view contact information. so register here : kpmarriage.com- Free matrimonial website
Displaying organization chart using treeview control
on 2:39 AM
Suggested Videos
Part 161 - Binding treeview control to web.sitemap file
Part 162 - Binding asp.net treeview control to database table
Part 163 - Dynamically adding treenodes to treeview control
In this video, we will discuss, displaying organization employee chart using TreeView control.
We will use the following table tblEmployee in this demo

We want to display above data in a TreeView control as shown below. A check box should be displayed next to every TreeNode. On clicking the button, the selected employees must be added to the listbox.

SQL script to create and populate table tblEmployee
Create table tblEmployee
(
ID int identity primary key,
Name nvarchar(50),
ManagerId int foreign key references tblEmployee(ID)
)
Insert into tblEmployee values('David', NULL)
Insert into tblEmployee values('Sam', 1)
Insert into tblEmployee values('Pam', 1)
Insert into tblEmployee values('Mike', 1)
Insert into tblEmployee values('John', 2)
Insert into tblEmployee values('Tara', 2)
Insert into tblEmployee values('Todd', 4)
Stored procedure to retrieve data from table tblEmployee
Create Proc spGetEmployees
as
Begin
Select ID, Name, ManagerId from tblEmployee
End
ASPX HTML
<div style="font-family:Arial">
<table>
<tr>
<td style="border:1px solid black">
<asp:TreeView ID="TreeView1" ShowCheckBoxes="All"
runat="server">
</asp:TreeView>
</td>
<td>
<asp:Button ID="Button1" runat="server" onclick="Button1_Click"
Text=">>" />
</td>
<td>
<asp:ListBox ID="ListBox1" runat="server" Height="145px"
Width="100px">
</asp:ListBox>
</td>
</tr>
</table>
</div>
ASPX.CS Code:
using System;
using System.Web.UI.WebControls;
using System.Data;
using System.Data.SqlClient;
using System.Configuration;
namespace WebFormsDemo
{
public partial class WebForm1 : System.Web.UI.Page
{
protected void Page_Load(object sender, EventArgs e)
{
if (!IsPostBack)
{
GetTreeViewItems();
}
}
private void GetTreeViewItems()
{
string cs = ConfigurationManager.ConnectionStrings["DBCS"].ConnectionString;
SqlConnection con = new SqlConnection(cs);
SqlDataAdapter da = new SqlDataAdapter("spGetEmployees", con);
DataSet ds = new DataSet();
da.Fill(ds);
ds.Relations.Add("ChildRows", ds.Tables[0].Columns["ID"],
ds.Tables[0].Columns["ManagerId"]);
foreach (DataRow level1DataRow in ds.Tables[0].Rows)
{
if (string.IsNullOrEmpty(level1DataRow["ManagerId"].ToString()))
{
TreeNode parentTreeNode = new TreeNode();
parentTreeNode.Text = level1DataRow["Name"].ToString();
parentTreeNode.Value = level1DataRow["ID"].ToString();
GetChildRows(level1DataRow, parentTreeNode);
TreeView1.Nodes.Add(parentTreeNode);
}
}
}
private void GetChildRows(DataRow dataRow, TreeNode treeNode)
{
DataRow[] childRows = dataRow.GetChildRows("ChildRows");
foreach (DataRow row in childRows)
{
TreeNode childTreeNode = new TreeNode();
childTreeNode.Text = row["Name"].ToString();
childTreeNode.Value = row["ID"].ToString();
treeNode.ChildNodes.Add(childTreeNode);
if (row.GetChildRows("ChildRows").Length > 0)
{
GetChildRows(row, childTreeNode);
}
}
}
protected void Button1_Click(object sender, EventArgs e)
{
ListBox1.Items.Clear();
GetSelectedTreeNodes(TreeView1.Nodes[0]);
}
private void GetSelectedTreeNodes(TreeNode parentTreeNode)
{
if (parentTreeNode.Checked)
{
ListBox1.Items.Add(parentTreeNode.Text + " - " + parentTreeNode.Value);
}
if (parentTreeNode.ChildNodes.Count > 0)
{
foreach (TreeNode childTreeNode in parentTreeNode.ChildNodes)
{
GetSelectedTreeNodes(childTreeNode);
}
}
}
}
}
Part 161 - Binding treeview control to web.sitemap file
Part 162 - Binding asp.net treeview control to database table
Part 163 - Dynamically adding treenodes to treeview control
In this video, we will discuss, displaying organization employee chart using TreeView control.
We will use the following table tblEmployee in this demo
We want to display above data in a TreeView control as shown below. A check box should be displayed next to every TreeNode. On clicking the button, the selected employees must be added to the listbox.
SQL script to create and populate table tblEmployee
Create table tblEmployee
(
ID int identity primary key,
Name nvarchar(50),
ManagerId int foreign key references tblEmployee(ID)
)
Insert into tblEmployee values('David', NULL)
Insert into tblEmployee values('Sam', 1)
Insert into tblEmployee values('Pam', 1)
Insert into tblEmployee values('Mike', 1)
Insert into tblEmployee values('John', 2)
Insert into tblEmployee values('Tara', 2)
Insert into tblEmployee values('Todd', 4)
Stored procedure to retrieve data from table tblEmployee
Create Proc spGetEmployees
as
Begin
Select ID, Name, ManagerId from tblEmployee
End
ASPX HTML
<div style="font-family:Arial">
<table>
<tr>
<td style="border:1px solid black">
<asp:TreeView ID="TreeView1" ShowCheckBoxes="All"
runat="server">
</asp:TreeView>
</td>
<td>
<asp:Button ID="Button1" runat="server" onclick="Button1_Click"
Text=">>" />
</td>
<td>
<asp:ListBox ID="ListBox1" runat="server" Height="145px"
Width="100px">
</asp:ListBox>
</td>
</tr>
</table>
</div>
ASPX.CS Code:
using System;
using System.Web.UI.WebControls;
using System.Data;
using System.Data.SqlClient;
using System.Configuration;
namespace WebFormsDemo
{
public partial class WebForm1 : System.Web.UI.Page
{
protected void Page_Load(object sender, EventArgs e)
{
if (!IsPostBack)
{
GetTreeViewItems();
}
}
private void GetTreeViewItems()
{
string cs = ConfigurationManager.ConnectionStrings["DBCS"].ConnectionString;
SqlConnection con = new SqlConnection(cs);
SqlDataAdapter da = new SqlDataAdapter("spGetEmployees", con);
DataSet ds = new DataSet();
da.Fill(ds);
ds.Relations.Add("ChildRows", ds.Tables[0].Columns["ID"],
ds.Tables[0].Columns["ManagerId"]);
foreach (DataRow level1DataRow in ds.Tables[0].Rows)
{
if (string.IsNullOrEmpty(level1DataRow["ManagerId"].ToString()))
{
TreeNode parentTreeNode = new TreeNode();
parentTreeNode.Text = level1DataRow["Name"].ToString();
parentTreeNode.Value = level1DataRow["ID"].ToString();
GetChildRows(level1DataRow, parentTreeNode);
TreeView1.Nodes.Add(parentTreeNode);
}
}
}
private void GetChildRows(DataRow dataRow, TreeNode treeNode)
{
DataRow[] childRows = dataRow.GetChildRows("ChildRows");
foreach (DataRow row in childRows)
{
TreeNode childTreeNode = new TreeNode();
childTreeNode.Text = row["Name"].ToString();
childTreeNode.Value = row["ID"].ToString();
treeNode.ChildNodes.Add(childTreeNode);
if (row.GetChildRows("ChildRows").Length > 0)
{
GetChildRows(row, childTreeNode);
}
}
}
protected void Button1_Click(object sender, EventArgs e)
{
ListBox1.Items.Clear();
GetSelectedTreeNodes(TreeView1.Nodes[0]);
}
private void GetSelectedTreeNodes(TreeNode parentTreeNode)
{
if (parentTreeNode.Checked)
{
ListBox1.Items.Add(parentTreeNode.Text + " - " + parentTreeNode.Value);
}
if (parentTreeNode.ChildNodes.Count > 0)
{
foreach (TreeNode childTreeNode in parentTreeNode.ChildNodes)
{
GetSelectedTreeNodes(childTreeNode);
}
}
}
}
}
If you are searching life partner. your searching end with kpmarriage.com. now kpmarriage.com offer free matrimonial website which offer free message, free chat, free view contact information. so register here : kpmarriage.com- Free matrimonial website
Dynamically adding treenodes to treeview control
on 2:39 AM
Suggested Videos
Part 160 - Binding asp.net treeview control to an xml file
Part 161 - Binding treeview control to web.sitemap file
Part 162 - Binding asp.net treeview control to database table
This is continuation to Part 162. Please watch Part 162, before proceeding.
We want to bind this data to a TreeView control. If you need the SQL Script to create and populate the table with sample data, please refer to Part 162.

This is how the treeview control should look.

Drag and drop a treeview control
<asp:TreeView ID="Treeview1" Target="_blank" runat="server">
</asp:TreeView>
Copy and paste the following code in the code-behind file.
using System;
using System.Collections.Generic;
using System.Linq;
using System.Web;
using System.Web.UI;
using System.Web.UI.WebControls;
using System.Data;
using System.Data.SqlClient;
using System.Configuration;
namespace WebFormsDemo
{
public partial class WebForm1 : System.Web.UI.Page
{
protected void Page_Load(object sender, EventArgs e)
{
if (!IsPostBack)
{
GetTreeViewItems();
}
}
private void GetTreeViewItems()
{
string cs = ConfigurationManager.ConnectionStrings["DBCS"].ConnectionString;
SqlConnection con = new SqlConnection(cs);
SqlDataAdapter da = new SqlDataAdapter("spGetTreeViewItems", con);
DataSet ds = new DataSet();
da.Fill(ds);
ds.Relations.Add("ChildRows", ds.Tables[0].Columns["ID"],
ds.Tables[0].Columns["ParentId"]);
foreach (DataRow level1DataRow in ds.Tables[0].Rows)
{
if (string.IsNullOrEmpty(level1DataRow["ParentId"].ToString()))
{
TreeNode parentTreeNode = new TreeNode();
parentTreeNode.Text = level1DataRow["TreeViewText"].ToString();
parentTreeNode.NavigateUrl = level1DataRow["NavigateURL"].ToString();
GetChildRows(level1DataRow, parentTreeNode);
Treeview1.Nodes.Add(parentTreeNode);
}
}
}
private void GetChildRows(DataRow dataRow, TreeNode treeNode)
{
DataRow[] childRows = dataRow.GetChildRows("ChildRows");
foreach (DataRow row in childRows)
{
TreeNode childTreeNode = new TreeNode();
childTreeNode.Text = row["TreeViewText"].ToString();
childTreeNode.NavigateUrl = row["NavigateURL"].ToString();
treeNode.ChildNodes.Add(childTreeNode);
if (row.GetChildRows("ChildRows").Length > 0)
{
GetChildRows(row, childTreeNode);
}
}
}
}
}
Part 160 - Binding asp.net treeview control to an xml file
Part 161 - Binding treeview control to web.sitemap file
Part 162 - Binding asp.net treeview control to database table
This is continuation to Part 162. Please watch Part 162, before proceeding.
We want to bind this data to a TreeView control. If you need the SQL Script to create and populate the table with sample data, please refer to Part 162.
This is how the treeview control should look.
Drag and drop a treeview control
<asp:TreeView ID="Treeview1" Target="_blank" runat="server">
</asp:TreeView>
Copy and paste the following code in the code-behind file.
using System;
using System.Collections.Generic;
using System.Linq;
using System.Web;
using System.Web.UI;
using System.Web.UI.WebControls;
using System.Data;
using System.Data.SqlClient;
using System.Configuration;
namespace WebFormsDemo
{
public partial class WebForm1 : System.Web.UI.Page
{
protected void Page_Load(object sender, EventArgs e)
{
if (!IsPostBack)
{
GetTreeViewItems();
}
}
private void GetTreeViewItems()
{
string cs = ConfigurationManager.ConnectionStrings["DBCS"].ConnectionString;
SqlConnection con = new SqlConnection(cs);
SqlDataAdapter da = new SqlDataAdapter("spGetTreeViewItems", con);
DataSet ds = new DataSet();
da.Fill(ds);
ds.Relations.Add("ChildRows", ds.Tables[0].Columns["ID"],
ds.Tables[0].Columns["ParentId"]);
foreach (DataRow level1DataRow in ds.Tables[0].Rows)
{
if (string.IsNullOrEmpty(level1DataRow["ParentId"].ToString()))
{
TreeNode parentTreeNode = new TreeNode();
parentTreeNode.Text = level1DataRow["TreeViewText"].ToString();
parentTreeNode.NavigateUrl = level1DataRow["NavigateURL"].ToString();
GetChildRows(level1DataRow, parentTreeNode);
Treeview1.Nodes.Add(parentTreeNode);
}
}
}
private void GetChildRows(DataRow dataRow, TreeNode treeNode)
{
DataRow[] childRows = dataRow.GetChildRows("ChildRows");
foreach (DataRow row in childRows)
{
TreeNode childTreeNode = new TreeNode();
childTreeNode.Text = row["TreeViewText"].ToString();
childTreeNode.NavigateUrl = row["NavigateURL"].ToString();
treeNode.ChildNodes.Add(childTreeNode);
if (row.GetChildRows("ChildRows").Length > 0)
{
GetChildRows(row, childTreeNode);
}
}
}
}
}
If you are searching life partner. your searching end with kpmarriage.com. now kpmarriage.com offer free matrimonial website which offer free message, free chat, free view contact information. so register here : kpmarriage.com- Free matrimonial website
Binding asp.net treeview control to database table
on 2:39 AM
Suggested Videos
Part 159 - TreeView control
Part 160 - Binding asp.net treeview control to an xml file
Part 161 - Binding treeview control to web.sitemap file
In this video, we will discuss binding asp.net treeview control to database table. This is continuation to Part 161, please watch Part 161 before proceeding.
1. Create the required database table using the script below.
Create table tblTreeViewItems
(
ID int identity primary key,
TreeViewText nvarchar(50),
NavigateURL nvarchar50),
ParentId int references tblTreeViewItems(ID)
)
-- Insert top level TreeView items
Insert into tblTreeViewItems values ('Home', '~/Home.aspx', NULL)
Insert into tblTreeViewItems values ('Employee', '~/Employee.aspx', NULL)
Insert into tblTreeViewItems values ('Employer', '~/Employer.aspx', NULL)
Insert into tblTreeViewItems values ('Admin', '~/Admin.aspx', NULL)
-- Insert Employee child items
Insert into tblTreeViewItems values ('Upload Resume', '~/UploadResume.aspx', 2)
Insert into tblTreeViewItems values ('Edit Resume', '~/EditResume.aspx', 2)
Insert into tblTreeViewItems values ('View Resume', '~/ViewResume.aspx', 2)
-- Insert Employer child items
Insert into tblTreeViewItems values ('Upload Job', '~/UploadJob.aspx', 3)
Insert into tblTreeViewItems values ('Edit Job', '~/EditJob.aspx', 3)
Insert into tblTreeViewItems values ('View Job', '~/ViewJob.aspx', 3)
-- Insert Admin child items
Insert into tblTreeViewItems values ('Add User', '~/AddUser.aspx', 4)
Insert into tblTreeViewItems values ('Edit User', '~/EditUser.aspx', 4)
Insert into tblTreeViewItems values ('View User', '~/ViewUser.aspx', 4)
2. Create a stored procedure that returns data from tblTreeViewItems table.
Create proc spGetTreeViewItems
as
Begin
Select ID, TreeViewText, NavigateURL, ParentId
from tblTreeViewItems
End
3. Drag and drop a treeview control on the webform
<asp:TreeView ID="Treeview1" runat="server">
</asp:TreeView>
4. Copy and paste the following ado.net code in the code-behind file.
protected void Page_Load(object sender, EventArgs e)
{
if (!IsPostBack)
{
GetTreeViewItems();
}
}
private void GetTreeViewItems()
{
string cs = ConfigurationManager.ConnectionStrings["DBCS"].ConnectionString;
SqlConnection con = new SqlConnection(cs);
SqlDataAdapter da = new SqlDataAdapter("spGetTreeViewItems", con);
DataSet ds = new DataSet();
da.Fill(ds);
ds.Relations.Add("ChildRows", ds.Tables[0].Columns["ID"],
ds.Tables[0].Columns["ParentId"]);
foreach (DataRow level1DataRow in ds.Tables[0].Rows)
{
if (string.IsNullOrEmpty(level1DataRow["ParentId"].ToString()))
{
TreeNode treeNode = new TreeNode();
treeNode.Text = level1DataRow["TreeViewText"].ToString();
treeNode.NavigateUrl = level1DataRow["NavigateURL"].ToString();
DataRow[] level2DataRows = level1DataRow.GetChildRows("ChildRows");
foreach (DataRow level2DataRow in level2DataRows)
{
TreeNode childTreeNode = new TreeNode();
childTreeNode.Text = level2DataRow["TreeViewText"].ToString();
childTreeNode.NavigateUrl = level2DataRow["NavigateURL"].ToString();
treeNode.ChildNodes.Add(childTreeNode);
}
Treeview1.Nodes.Add(treeNode);
}
}
}
Note: Please include the following using declarations.
using System.Data;
using System.Data.SqlClient;
using System.Configuration;
The above code works as expected only with 2 levels of TreeNode objects. If you include a third level, those TreeNodes will not be displayed in the TreeView control. For example, if you execute the following insert sql script. These rows will not be displayed in the TreeView control, we will discuss fixing this in our next video.
Insert into tblTreeViewItems values ('AAA', '~/AAA.aspx', 5)
Insert into tblTreeViewItems values ('BBB', '~/BBB.aspx', 5)
If you are searching life partner. your searching end with kpmarriage.com. now kpmarriage.com offer free matrimonial website which offer free message, free chat, free view contact information. so register here : kpmarriage.com- Free matrimonial website
kpmarriage advertise
|

Expense monitor Android App
