ANS :
When a visitor first requests an .aspx page on your server, the server sends it to the HTTP Pipeline. The HTTP Pipeline handles all processes involved in converting all of the application code into HTML to be interpreted by the browser. The first class initiated is called HttpRuntime. This class finds a free HttpApplication object to start processing the request. The HttpApplication object then runs the appropriate handler assigned in the web.config and machine.config files for the requested extension.
The extension .aspx can be handled by the HandlerClass or HandlerFactory class. The HttpApplication objects starts the IHttpHandler interface which begins processing the application code by calling the processRequest() method.
The processRequest() method then calls the FrameworkInitialize() method which begins building the control trees for the requested page. Now the processRequest() method cycles through the page's life cycle in the order listed below.
Following are the page life cycle events:
- PreInit - PreInit is the first event in page life cycle. It checks the IsPostBack property and determines whether the page is a postback. It sets the themes and master pages, creates dynamic controls, and gets and sets profile property values. This event can be handled by overloading the OnPreInit method or creating a Page_PreInit handler.
- Init - Init event initializes the control property and the control tree is built. This event can be handled by overloading the OnInit method or creating a Page_Init handler.
- InitComplete - InitComplete event allows tracking of view state. All the controls turn on view-state tracking.
- LoadViewState - LoadViewState event allows loading view state information into the controls.
- LoadPostData - During this phase, the contents of all the input fields are defined with the <form> tag are processed.
- PreLoad - PreLoad occurs before the post back data is loaded in the controls. This event can be handled by overloading the OnPreLoad method or creating a Page_PreLoad handler.
- Load - The Load event is raised for the page first and then recursively for all child controls. The controls in the control tree are created. This event can be handled by overloading the OnLoad method or creating a Page_Load handler.
- LoadComplete - The loading process is completed, control event handlers are run, and page validation takes place. This event can be handled by overloading the OnLoadComplete method or creating a Page_LoadComplete handler
- PreRender - The PreRender event occurs just before the output is rendered. By handling this event, pages and controls can perform any updates before the output is rendered.
- PreRenderComplete - As the PreRender event is recursively fired for all child controls, this event ensures the completion of the pre-rendering phase.
- SaveStateComplete - State of control on the page is saved. Personalization, control state and view state information is saved. The HTML markup is generated. This stage can be handled by overriding the Render method or creating a Page_Render handler.
- UnLoad - The UnLoad phase is the last phase of the page life cycle. It raises the UnLoad event for all controls recursively and lastly for the page itself. Final cleanup is done and all resources and references, such as database connections, are freed. This event can be handled by modifying the OnUnLoad method or creating a Page_UnLoad handler
What is Polymorphism
ANS :
Polymorphism means many forms (ability to take more than one form). In Polymorphism poly means "multiple" and morph means "forms" so polymorphism means many forms.
In polymorphism we will declare methods with same name and different parameters in same class or methods with same name and same parameters in different classes. Polymorphism has ability to provide different implementation of methods that are implemented with same name.
In Polymorphism we have 2 different types those are
- Compile Time Polymorphism (Called as Early Binding or Overloading or static binding)
- Run Time Polymorphism (Called as Late Binding or Overriding or dynamic binding)
Compile Time Polymorphism
Compile time polymorphism means we will declare methods with same name but different signatures because of this we will perform different tasks with same method name. This compile time polymorphism also called as early binding or method overloading.
Method Overloading or compile time polymorphism means same method names with different signatures (different parameters)
Example
public class Class1
{
public void NumbersAdd(int a, int b)
{
Console.WriteLine(a + b);
}
public void NumbersAdd(int a, int b, int c)
{
Console.WriteLine(a + b + c);
}
}
In above class we have two methods with same name but having different input parameters this is called method overloading or compile time polymorphism or early binding.
Run Time Polymorphism
Run time polymorphism also called as late binding or method overriding or dynamic polymorphism. Run time polymorphism or method overriding means same method names with same signatures.
In this run time polymorphism or method overriding we can override a method in base class by creating similar function in derived class this can be achieved by using inheritance principle and using "virtual & override" keywords.
In base class if we declare methods with virtual keyword then only we can override those methods in derived class using override keyword
Example
//Base Class
public class Bclass
{
public virtual void Sample1()
{
Console.WriteLine("Base Class");
}
}
// Derived Class
public class DClass : Bclass
{
public override void Sample1()
{
Console.WriteLine("Derived Class");
}
}
// Using base and derived class
class Program
{
static void Main(string[] args)
{
// calling the overriden method
DClass objDc = new DClass();
objDc.Sample1();
// calling the base class method
Bclass objBc = new DClass();
objBc.Sample1();
}
}
If we run above code we will get output like as shown below
Output
:Derived Class
: Derived Class
Virtual Keyword
Virtual keyword is used for generating a virtual path for its derived classes on implementing method overriding. Virtual keyword is used within a set with override keyword. It is used as:
// Base Class
class A
{
public virtual void show()
{
Console.WriteLine("Hello: Base Class!");
Console.ReadLine();
}
}
Override Keyword
Override keyword is used in the derived class of the base class in order to override the base class method. Override keyword is used with virtual keyword, as:
// Base Class
class A
{
public virtual void show()
{
Console.WriteLine("Hello: Base Class!");
Console.ReadLine();
}
}
// Derived Class
class B : A
{
public override void show()
{
Console.WriteLine("Hello: Derived Class!");
Console.ReadLine();
}
}
Sealed Class
A sealed class is a class that cannot be inherited. Sealed classes are used to restrict the inheritance feature of object oriented programming.
Sealed class is used to define the inheritance level of a class.
The sealed modifier is used to prevent derivation from a class. An error occurs if a sealed class is specified as the base class of another class.
Some points to remember:
1. A class, which restricts inheritance for security reason is declared, sealed class.
2. Sealed class is the last class in the hierarchy.
3. Sealed class can be a derived class but can't be a base class.
4. A sealed class cannot also be an abstract class. Because abstract class has to provide functionality and here we are
restricting it to inherit.
Sealed Methods
Sealed method is used to define the overriding level of a virtual method.
Sealed keyword is always used with override keyword.
Practical demonstration of sealed method
using System;
using System.Collections.Generic;
using System.Linq;
using System.Text;
namespace sealed_method
{
class Program
{
public class BaseClass
{
public virtual void Display()
{
Console.WriteLine("Virtual method");
}
}
public class DerivedClass : BaseClass
{
// Now the display method have been sealed and can;t be overridden
public override sealed void Display()
{
Console.WriteLine("Sealed method");
}
}
//public class ThirdClass : DerivedClass
//{
// public override void Display()
// {
// Console.WriteLine("Here we try again to override display method which is not possible and will give error");
// }
//}
static void Main(string[] args)
{
DerivedClass ob1 = new DerivedClass();
ob1.Display();
Console.ReadLine();
}
}
}
Types of state management
There are two types of state management techniques: client side and server side.
Client side
- Hidden Field
- View State
- Cookies
- Control State
- Query Strings
Server side
- Session
- Application
1. Session
Session management is a very strong technique to maintain state. Generally session is used to store user's information and/or uniquely identify a user (or say browser). The server maintains the state of user information by using a session ID. When users makes a request without a session ID,
ASP.NET creates a session ID and sends it with every request and response to the same user.
To manage a session, ASP.NET provides two events: session_start and session_end that is written in a special file called Global.asax in the root directory of the project.
Session_Start: The Session_start event is raised every time a new user makes a request without a session ID, i.e., new browser accesses the application, then a session_start event raised. Let's see the Global.asax file.
void Session_Start(object sender, EventArgs e)
{
Session["Count"] = 0; // Code that runs when a new session is started
}
Session_End: The Session_End event is raised when session ends either because of a time out expiry or explicitly by using Session.Abandon(). The Session_End event is raised only in the case of In proc mode not in the state server and SQL Server modes.
There are four session storage mechanisms provided by ASP.NET:
- In Proc mode
- State Server mode
- SQL Server mode
- Custom mode
In Process mode:
In proc mode is the default mode provided by
ASP.NET. In this mode, session values are stored in the web server's memory (in IIS). If there are more than one IIS servers then session values are stored in each server separately on which request has been made. Since the session values are stored in server, whenever server is restarted the session values will be lost.
<configuration>
<sessionstate mode="InProc" cookieless="false" timeout="10"
stateConnectionString="tcpip=
127.0.0.1:80808"
sqlConnectionString="Data Source=.\SqlDataSource;User ID=userid;Password=password"/>
</configuration>
In State Server mode: This mode could store session in the web server but out of the application pool. But usually if this mode is used there will be a separate server for storing sessions, i.e., stateServer. The benefit is that when IIS restarts the session is available. It stores session in a separate Windows service. For State server session mode, we have to configure it explicitly in the web config file and start the aspnet_state service.
<configuration><sessionstate mode="stateserver" cookieless="false"
timeout="10"
stateConnectionString="tcpip=
127.0.0.1:42424"
sqlConnectionString="Data Source=.\SqlDataSource;User ID=userid;Password=password"/> </configuration>
In SQL Server mode: Session is stored in a SQL Server database. This kind of session mode is also separate from IIS, i.e., session is available even after restarting the IIS server. This mode is highly secure and reliable but also has a disadvantage that there is overhead from serialization and deserialization of session data. This mode should be used when reliability is more important than performance.
<configuration>
<sessionstate mode="sqlserver" cookieless="false" timeout="10"
stateConnectionString="tcpip=
127.0.0.1:4 2424"
sqlConnectionString="Data Source=.\SqlDataSource;User ID=userid;Password=password"/>
</configuration>
2. Application
Application state is a server side state management technique. The date stored in application state is common for all users of that particular
ASP.NET application and can be accessed anywhere in the application. It is also called application level state management. Data stored in the application should be of small size.
How to get and set a value in the application object:
Application["Count"] = Convert.ToInt32(Application["Count"]) + 1; //Set Value to The Application Object
Label1.Text = Application["Count"].ToString(); //Get Value from the Application Object
Static class
C# provides the important feature to create static classes, there are two main features of a static class, one is no object of static class can be created and another is, a static class must contain only static members, then it is important that what is the main benefit to create a static class, the main benefit of making static class, we do not need to make any instance of this class ,all members can be accessible with its own name.
Declaration:
A static class is created by using keyword 'Static' as shown here:
Static class Clasname
{
//C#
}
One more thing that is notable-within static class, all members must be explicitly specified as static, static class does not automatically make its members static. Static class can contain a collection of static methods.
Example:
using System;
static class Shape
{
public static double GetArea(double Width, double height)
{
return Width * Height;
}
}
class Ractangle
{
private void GetRactangleArea()
{
Double Area;
Area = Shape.GetArea(10, 5);
}
}
Shape is static class, it contain staic function GetArea.Ractangle is other class and with in GetArea function can be access without creating instace of Class Shape.
Although a static class cannot have an instance constructor, it can have a static constructor.
Abstract and Sealed Classes and Class Members
The
abstract keyword enables you to create classes and
class members that are incomplete and must be implemented in a derived class.
The
sealed keyword enables you to prevent the inheritance of a class or certain class members that were previously marked
virtual.
Abstract Classes and Class Members
Classes can be declared as abstract by putting the keyword abstract before the class definition. For example:
C#
public abstract class A
{
// Class members here.
}
An abstract class cannot be instantiated. The purpose of an abstract class is to provide a common definition of a base class that multiple derived classes can share. For example, a class library may define an abstract class that is used as a parameter to many of its functions, and require programmers using that library to provide their own implementation of the class by creating a derived class.
Abstract classes may also define abstract methods. This is accomplished by adding the keyword abstract before the return type of the method. For example:
C#
public abstract class A
{
public abstract void DoWork(int i);
}
Abstract methods have no implementation, so the method definition is followed by a semicolon instead of a normal method block. Derived classes of the abstract class must implement all abstract methods. When an abstract class inherits a virtual method from a base class, the abstract class can override the virtual method with an abstract method. For example:
interface
An interface contains only the signatures of
methods,
properties,
events or
indexers. A class or struct that implements the interface must implement the members of the interface that are specified in the interface definition. In the
interface ISampleInterface
{
void SampleMethod();
}
class ImplementationClass : ISampleInterface
{
// Explicit interface member implementation:
void ISampleInterface.SampleMethod()
{
// Method implementation.
}
static void Main()
{
// Declare an interface instance.
ISampleInterface obj = new ImplementationClass();
// Call the member.
obj.SampleMethod();
}
}
ArrayList
1. ArrayList belongs to the System.Collections namespace, i.e. you need to import the following namespace.
C#
using System.Collections;
VB.Net
Imports System.Collections
2. ArrayList does not have type restriction for storing data i.e. it is not Type Safe. You can store anything in ArrayList. In fact same ArrayList can store multiple types of objects.
C#
ArrayList arrList = new ArrayList();
arrList.Add(921);
arrList.Add("Mudassar Khan");
arrList.Add(DateTime.Now);
VB.Net
Dim arrList As New ArrayList()
arrList.Add(921)
arrList.Add("Mudassar Khan")
arrList.Add(DateTime.Now)
3. ArrayList stores all data as object thus to get it back you must remember what you stored where and correspondingly Type Cast it as per its original Type when stored.
C#
int number = Convert.ToInt32(arrList[0]);
string name = arrList[1].ToString();
DateTime dt = Convert.ToDateTime(arrList[2]);
VB.Net
Dim number As Integer = Convert.ToInt32(arrList(0))
Dim name As String = arrList(1).ToString()
Dim dt As DateTime = Convert.ToDateTime(arrList(2))
4. ArrayList is mainly for .Net 2.0 Framework projects as during that period Generic List was not invented.
5. While running a Loop on ArrayList you need to use Object data type. Thus this is another disadvantage as you again do not know what type of data particular item contains.
C#
foreach (object o in arrList)
{
}
VB.Net
For Each o As Object In arrList
Next
Generic Lists (List)
1. Generic List (List) belongs to the System.Collections.Generic namespace, i.e. you need to import the following namespace.
C#
using System.Collections.Generic;
VB.Net
Imports System.Collections.Generic
2. In Generic List (List), T means data type, i.e. string, int, DateTime, etc. Thus it will store only specific types of objects based on what data type has been specified while declarations i.e. it is Type Safe. Thus if you have a Generic List of string you can only store string values, anything else will give compilation error.
Below I had no option other than having three different Generic Lists for three different data types.
C#
List lstString = new List();
lstString.Add("Mudassar Khan");
lstString.Add("Robert Hammond");
lstString.Add("Ramesh Singh");
List lstInt = new List();
lstInt.Add(991);
lstInt.Add(10);
lstInt.Add(4450);
List lstDateTime = new List();
lstDateTime.Add(DateTime.Now);
lstDateTime.Add(DateTime.Now.AddDays(20));
lstDateTime.Add(DateTime.Now.AddHours(-10));
VB.Net
Dim lstString As New List(Of String)()
lstString.Add("Mudassar Khan")
lstString.Add("Robert Hammond")
lstString.Add("Ramesh Singh")
Dim lstInt As New List(Of Integer)()
lstInt.Add(991)
lstInt.Add(10)
lstInt.Add(4450)
Dim lstDateTime As New List(Of DateTime)()
lstDateTime.Add(DateTime.Now)
lstDateTime.Add(DateTime.Now.AddDays(20))
lstDateTime.Add(DateTime.Now.AddHours(-10))
3. Generic List stores all data of the data type it is declared thus to getting the data back is hassle free and no type conversions required.
C#
int number = lstInt[0];
string name = lstString[0];
DateTime dt = lstDateTime[0];
VB.Net
Dim number As Integer = lstInt(0)
Dim name As String = lstString(0)
Dim dt As DateTime = lstDateTime(0)
4. Generic List must be used instead of ArrayList unless specific requirement for projects higher than .Net 2.0 Framework.
5. While running a Loop on Generic List again it is problem free as we exactly know what the List contains.
C#
foreach (int number in lstInt)
{
}
foreach (string name in lstString)
{
}
foreach (DateTime dt in lstDateTime)
{
}
VB.Net
For Each number As Integer In lstInt
Next
For Each name As String In lstString
Next
For Each dt As DateTime In lstDateTime
Next
Arrays
Arrays are strongly typed collection of same datatype and these arrays are fixed length that cannot be changed during runtime. Generally in arrays we will store values with index basis that will start with zero. If we want to access values from arrays we need to pass index values.
Declaration of Arrays
Generally we will declare arrays with fixed length and store values like as shown below
string[] arr=new string[2];
arr[0] = "welcome";
arr[1] = "Aspdotnet-suresh";
In above code I declared array size 2 that means we can store only 2 string values in array.
This article focuses on how MS SQL Server uses indexes to read and write data. Data is arranged by SQL Server in the form of extents and pages. Each extent is of size 64 KB, having 8 pages of 8KB sizes. An extent may have data from multiple or same table, but each page holds data from a single table only. Logically, data is stored in record sets in the table. We have fields (columns) identifying the type of data contained in each of the record sets. A table is nothing but a collection of record sets; by default, rows are stored in the form of heaps unless a clustered index has been defined on the table, in which case, record sets are sorted and stored on the clustered index. The heaps structure is a simple arrangement where the inserted record is stored in the next available space on the table page.
Heaps seem a great option when the motive is simply storing data, but when data retrieval steps in, this option back fires. An index acts as a fire fighter in this scenario. Indexes are arranged in the form of a B-Tree where the leaf node holds the data or a pointer to the data. Since the stored data is in a sorted order, indexes precisely know which record is sitting where. Hence an index optimizes and enhances the data retrieval immensely.
But everything comes at a cost; the price we pay for having an index on the table is, each time there is an Insert/Update/Delete, SQL Server updates the active indexes on the table where these DML are operated. Hence simply creating indexes madly for the sake of better data retrieval will not serve the purpose. If there are 20 indexes on a table, each time a DML is done on the table, all these 20 indexes shall be updated so that they can uniquely figure out the location of the record. Let’s dive deep into the indexes.
Clustered Index (CI)
A clustered index is something that reorganizes the way records in the table are physically stored. Therefore a table can have only one clustered index. The leaf nodes of a clustered index contain the data pages, by which I mean the key-value pair in the clustered index has the index key and the actual data value. Also remember, a clustered index will be created on a table by default the moment a primary key is created on the table. A clustered index is something like your train ticket B4/24, you know that you need to board coach B4 and sit on seat number 24. So this index physically leads you to your actual seat.
We will follow this up closely with an example:
Hide Copy Code
USE TestDB
GO

CREATE TABLE Sales(
 ID INT IDENTITY(1,1)
,ProductCode VARCHAR(20)
,Price FLOAT(53)
,DateTransaction DATETIME);
I have created a table Sales, and then created a Stored Procedure to insert 2,00,000 records into the Sales table. This sizable chunk of data will help us to notice the differences very clearly.
Hide Copy Code
CREATE PROCEDURE InsertIntoSales
AS
SET NOCOUNT ON
BEGIN
DECLARE @PC VARCHAR(20)='A12CB'
DECLARE @Price INT = 50
DECLARE @COUNT INT = 0
      WHILE @COUNT<200000 class="code-keyword" span="" style="border: 0px; color: blue; margin: 0px; padding: 0px;">BEGIN
SET @PC=@PC+CAST(
@COUNT AS VARCHAR(
20))
SET @Price=@Price+@COUNT
INSERT INTO Sales
VALUES (
@PC,
@Price,GETDATE())
SET @PC=
'A12CB'
SET @Price=50
SET @COUNT+=1
END
END
EXEC InsertIntoSales
Now we have created the table and inserted 2,00,000 records into it, but there is no index defined on any column.
Press Control+M. This will “Include the Actual Execution Plan” in the results. Let's run the below query.
Hide Copy Code
SET STATISTICS IO ON
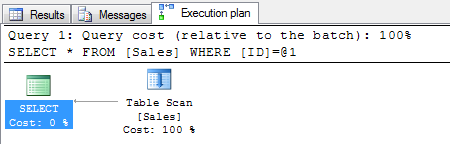
SELECT * FROM Sales WHERE ID=189923
ID ProductCode Price DateTransaction
189923 A12CB189922 189972 2011-03-21 12:07:48.310
(1 row(s) affected)
Table 'Sales'. Scan count 1, logical reads 1129, physical reads 0,
read-ahead reads 0, lob logical reads 0,
lob physical reads 0, lob read-ahead reads 0.
(1 row(s) affected)
The Execution plan tab on the results show that the record has been retrieved on a table scan and the logical reads are 1129.
Now let’s build a clustered index on the ID column of the Sales table.
Hide Copy Code
CREATE CLUSTERED INDEX CL_ID ON SALES(ID);
Let us press CTRL+M and rerun the same query:
Hide Copy Code
SET STATISTICS IO ON
SELECT * FROM Sales WHERE ID=189923
ID ProductCode Price DateTransaction
189923 A12CB189922 189972 2011-03-21 12:07:48.310
(1 row(s) affected)
Table 'Sales'. Scan count 1, logical reads 3, physical reads 0,
read-ahead reads 0, lob logical reads 0,
lob physical reads 0, lob read-ahead reads 0.
(1 row(s) affected)
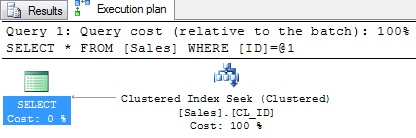
The Execution plan tab on the results shows that the record has been retrieved on Index seek and the logical reads are 3. After the clustered index creation, SQL Server has been able to reduce the logical reads dramatically and the query has been optimized. Clearly the index knows where to look for the record.
Non-Clustered Index (NCI)
A non-clustered index is a special type of index in which the logical order of the index does not match the physical stored order of the rows on disk. The leaf node of a non-clustered index does not consist of the data pages but a pointer to it. That goes to say that a non-clustered index can’t survive on its own - it needs a base to live on. A non-clustered index uses a clustered index (if defined) or the heap to build itself.
When a non-clustered index uses the heap, the leaf node (or the pointer) is a physical location of the data. When it uses a clustered index, the leaf node (or the pointer) is the clustered index key value and this key value in turn points to the actual data.
Part I: When NCI Uses a CI
Getting back to Sales, we already have a CI (CL_ID) on the ID column, now if we have a query something like:
Hide Copy Code
SET STATISTICS IO ON
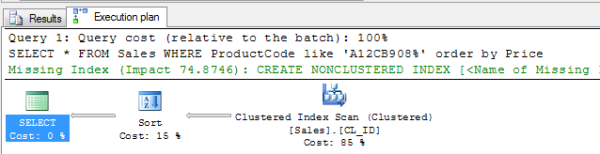
SELECT * FROM Sales WHERE ProductCode like 'A12CB908%' order by Price
Press Control+M and execute the query
There are arround 111 records retrived
(111 row(s) affected)
Table 'Sales'. Scan count 1, logical reads 1130, physical reads 0,
read-ahead reads 0, lob logical reads 0,
lob physical reads 0, lob read-ahead reads 0.
(1 row(s) affected)
We find that the query first uses the clustered index to get 111 records and then uses a sort operation; the logical reads are as high as 1130. There is also a missing index suggestion.
Let’s consider SQL Server’s advice and create a non-clustered index (NONCI_PC) on the ProductCode column. Since we have a CI already, this NCI would be built on the CI.
Hide Copy Code
CREATE NONCLUSTERED INDEX NONCI_PC ON SALES(ProductCode);
Press Control+M and rerun the same query, this time around, we can see the data fetch plan change.
Hide Copy Code
SET STATISTICS IO ON
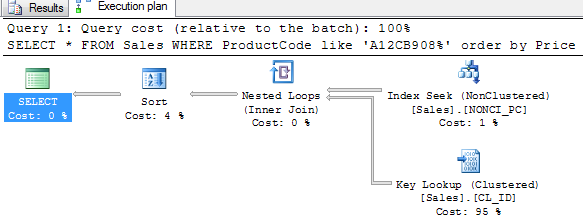
SELECT * FROM Sales WHERE ProductCode like 'A12CB908%' order by Price
(111 row(s) affected)
Table 'Sales'. Scan count 1, logical reads 351, physical reads 0,
read-ahead reads 7, lob logical reads 0,
lob physical reads 0, lob read-ahead reads 0.
(1 row(s) affected)
The logical reads have been minimized and the revised execution plan is as in the figure. This was the example where a non-clustered index used a clustered index.
Part II: When NCI Uses a Heap
When there is no clustered index built on a table and a non-clustered index is built, it uses the heap for data retrieval. The indexed column or columns are sorted along with a pointer to the physical location of the data.
The big question is, how do I know if I should create an NCI on a CI or on a heap?
The answer is in the query, if data is queried typically on one particular column, it would be beneficial to build NCI upon a CI, but when the case is something like what we have in the present Sales example where we will be building a one-column NC index on a heap, the NCI would be merely a two-column table containing the key-value pair (index key and physical location, i.e., value). This would be the best optimization in this scenario. To follow this up, let’s review the example closely.
With respect to the sales example, let’s delete the clustered index CL_ID created on the ID column and re-evaluate.
Hide Copy Code
DROP INDEX Sales.CL_ID;
SET STATISTICS IO ON
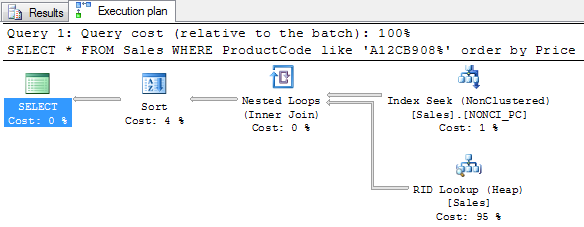
SELECT * FROM Sales WHERE ProductCode like 'A12CB908%' order by Price
(111 row(s) affected)
Table 'Sales'. Scan count 1, logical reads 114, physical reads 0,
read-ahead reads 0, lob logical reads 0,
lob physical reads 0, lob read-ahead reads 0.
(1 row(s) affected)
The logical reads have been further optimized and the execution plan also has been revised. In this case, the query uses the non-clustered index to be run on the heap.